

If you develop a dynamic website and manage everything dynamically on the website, you will have to create an admin panel. It works as an intermediate to manage dynamic data between the database & website. Means that it fetches the data from the database based on users request using backend language.
So, I have used HTML, CSS , jquery & bootstrap in front-end and PHP, Ajax & MySQL for the backend. All the codes are written in a proper & standard form in a separate file so that you can easily understand and quickly implement it in your project. Even you can configure its setting without loading the page.
Simple Admin Panel Template in PHP, Ajax & Bootstrap
Before Creating an admin Panel in PHP, You should know the following information. It will help you to integrate easily into your website.
| Compatible Browsers | IE11, Firefox, Safari, Opera, Chrome, Edge |
| Files Included | HTML, CSS, PHP, jQuery Ajax,MySQL, Bootstrap |
| Software Version | PHP 7.x, PHP 5.x, PHP 5.0 – 5.2 |
Features
You will get the following most attractive & user-friendly features.
- User-friendly Design
- Mobile Responsive
- Shared Hosting Compatible
- PHP cURL Support
- Fast & Secure
- Easy to Integrate
- Bootstrap4 Framework
- Fully Ajax Based
- Dynamic Data Management without Reloading
- MySQL Database
- Admin Dashboard Design Setting
Functionality –
All the following functionality is created using ajax without refreshing the page –
- Login with security
- Logout on one click
- Contact detail management
- Website theming
- Admin theming
- Static Content Management
- Website Title & description Management
- Admin Profile Management
Admin Panel Pages
You will get the following default pages with Admin Panel.
- Admin Login
- Admin Dashboard
- Website Setting
- Theme Setting
- Admin Logout
- Contact Details
- Contact Email
- Website Menu
- Contact Us Message
- Home Content
- Admin Profile
- Change Password
- Admin Theme Setting
How to Connect Admin Panel to Website
You can easily connect the admin panel to the website. if you configure the following steps –
1. Get Free Source Code
First of all, you need to get an admin panel script for your website. Don’t worry. I have provided free source code to connect it. you can get it through the following links –
Click Here to Get Admin Panel Source Code
2. Extract Zip File
Now, extract the zip file and paste it into your website folder.
3. Import SQL Database file
You will get database & table files in the ( config) folder. You can import either a database file or table file in your database according to your requirement.
4. Configure Database Connection
Open database.php and update the database connection details. This file remains in the ( config) folder.
5. Log in to Admin Panel
You can log in to the admin panel with the following credentials –
Admi Lodin URL – http://localhost/codingstatus/admin-panel/
| S. N | Password | |
| 1 | [email protected] | admin123 |
| 2 | [email protected] | admin123 |
| 3 | [email protected] | admin123 |
How to Create an Admin Panel for the Website in PHP
If you are a web developer and working with PHP & MySQL. You must read all the following points to learn a new & standard concept. It will also learn you How to write code in a smart way. So, It will be very helpful to increase your coding skills power.
You have already know how to get a free admin panel source code in the previous step. Here, You will get the complete information about files & setting to create an admin panel in PHP.
Before writing the code, You should create the following folder structure –
admin-panel
   |__assets/
   |    |__css/
   |        |_style.css
   |__config/
   |    |__database.php
   |__contact/
   |    |__contact-details.php
   |    |__contact-email.php
   |    |__contact-us-message.php
   |__partials/
   |    |__header.php
   |    |__sidebar.php
   |__scripts/
   |    |__ajax-script.js
   |    |__backend-script.php
   |    |__dynamic-page.php
   |    |__multilevel-script.php
   |    |__admin-login.php
   |__setting/
   |    |__admin-panel.php
   |    |__color-setting.php
   |__website-admin/
   |    |__admin-profile.php
   |    |__change-password.php
   |__website-content/
   |    |__home-content.php
   |__website-setting
   |    |__theme-setting.php
   |    |__website-menu.php
   |    |__website-setting.php
   |__dashboard.php
   |__home.php
   |__index.php
   |__logout.php
let’s start to configure the following steps –
1. Create MySQL Database and Table
You must create a MySQL database using the following query –
Database Name – admin_panel
You must also create tables using the following query –
Table Name – admin_profile
This table is created to store the admin profile detail
CREATE TABLE `admin_profile` (
Table Name – categories
This table is created to store the website header & footer menu
CREATE TABLE `categpries` (
Table Name – color_setting
This table is created to store color name
CREATE TABLE `color_setting` (
Table Name – contacts
This table is created to store contact message
CREATE TABLE `contacts` (
Full Name – contact-details
This table is created to store contact details
CREATE TABLE `contact_details` (
Full Name – contact-email
This table is created to store contact us an email address
CREATE TABLE `contact_email` (
Full Name – home_contact
This table is created to store static content for the website home page
CREATE TABLE `home_contact` (
Full Name – theme_setting
This table is created to store theme color
CREATE TABLE `theme_setting` (
Table Name – website_setting
This table is created to store the website basics information
CREATE TABLE `website_setting` (
) ENGINE=InnoDB DEFAULT CHARSET=latin1;
2. Connect PHP Script to MySQL Database
Connect Admin Panel PHP script to MySQL database –
File Name – database.php
3. Create an Admin login
Configure the following points in index.php to create an admin panel –
- First of all, start the session
- Assign session login email to a variable
$email_address $email_addressis not empty, redirect to thedashboard.php.- Include database file
database.php& admin loginadmin-login.php - Write the HTML code to create an admin login form.
- Display login success & fail message.
4. Create an Admin Dashboard
Configure the following points in dashboard.php to create an admin dashboard –
- First of all, start the session
- Assign session login email to a variable
$email_address $email_addressis not empty, redirect to theindex.php.- Get the value of
cat&subcatquery string value. - Include the admin files based on
cat&subcatquery string value. - Write HTML code to create an admin dashboard.
5. Create Admin Header
Configure the following points in header.php to create an admin header –
- Write the HTML code to create the Admin Header.
- Fetch the color value from the database.
- print it within a CSS style to change the admin theme color.
6. Create Admin Sidebar
Configure the following points in sidebar.php to create an admin sidebar –
- Write HTML code to create a sidebar.
- Create sidebar link URL with a query string parameter
cat&subcat
7. Create Admin Pages
Create the following admin pages and configure the CRUD operation using ajax & PHP. It will explain in the next step –
- Contact Detail – Create it to update website contact detail like email, mobile number, address & social link.
- Contact Email – Create it to set up an email for the contact us page.
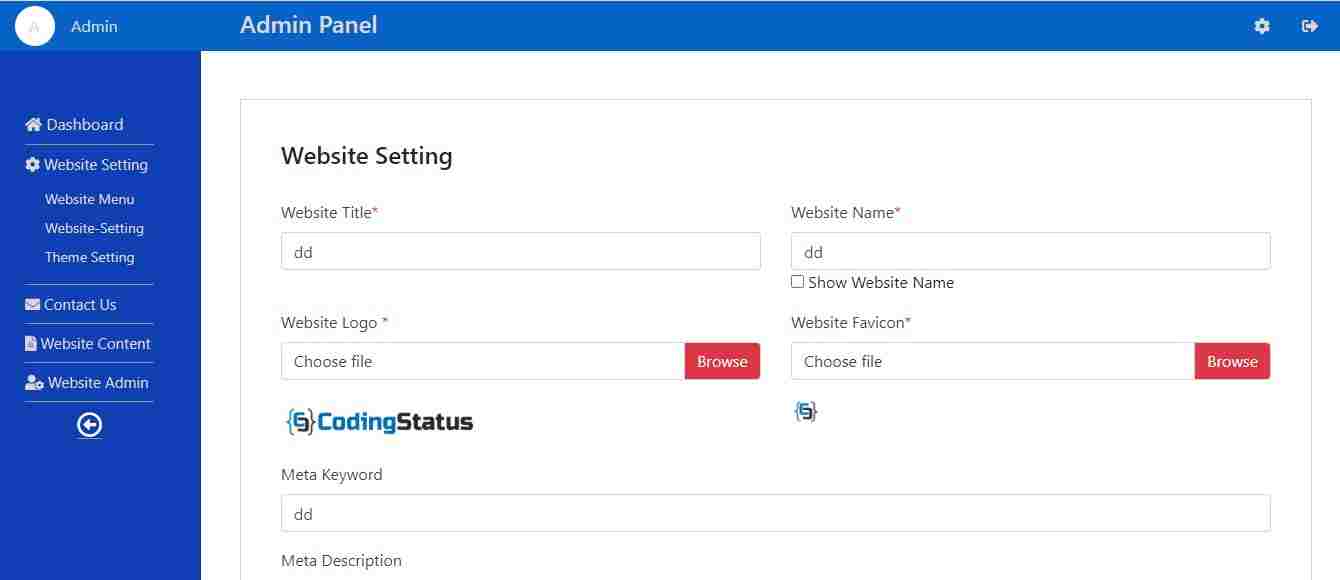
- Website Setting – Create it to configure a basic website setting like logo, favicon, website name, website title, meta keyword & description.
- Contact Us Message – Create it to display contact us a message.
- Theme Setting – Create it to configure basic theme settings like navbar & text color.
- Website Menu – Create it to create a multilevel menu for header & footer
- Home Content – Create it to update static content on the website home page.
- Admin Profile – Create it to update existing admin & add a new admin to assign role admin panel
- Change Password – Create it to change the admin password.
- Admin Theme Setting – Create it to set up admin theme settings like text & background color.
8. Create Ajax Script
To configure the following operation without reading the page, you will have to create ajax script to send a request to backend-script.php file –
- Open admin pages on click sidebar link with
a.content-link - Insert form data into the database on submit with form id
#adminForm - Update data in a database on submitting with form id
#updateForm - Delete data from the database on click a link with a class
.delete - Allow admin to manage data on click link with a class
.adminRole
9. Create a Backend PHP Script
You have to create a backend PHP script in the following files. Each script file has its own functionality to perform.
- backend-scritp.php – Create it to perform the CRUD operation of admin pages.
- dynamic-page.php – Create it to include the admin page dynamically.
- multilevel-script.php – Create it to create a multilevel menu for the header & footer menu.
Summary –
I have guided you to create an admin panel template in PHP with some basic & general features & functionality. Now you can create more functionality yourself according to your project requirement.
If you have any questions related to this tutorial or web development tutorials, Ask me through the comment box. Even you can suggest web development topics to share a complete guide.